Weld Inspection and Non-Destructive Testing
- Rafael Nunes

- Apr 29, 2020
- 4 min read
Updated: May 13, 2020
Non-Destructive Tests (NDT) are techniques used in the inspection of materials and equipment without destroying or damaging them, being performed in the stages of manufacturing, construction, assembly and maintenance. In other words, the NDT are performed to attest the quality of a particular part, without it being damaged.
The main applications of NDT can be found in various industrial fields such as automotive, oil and gas, aerospace, rail, nuclear, among many others, being widely used to verify the quality of weld inspections and to guarantee the integrity of cast materials, forged, laminated, extruded, as well as other types of materials.
NDTs include methods capable of providing information regarding the defect content of a given equipment, the technological characteristics of a material, or even monitoring the degradation in service of components, equipment and structures.
Advantages of Non-Destructive Testing:
Allows to inspect 100% of a component;
Provides results for the entire volume of an equipment;
Contributes to improving the project of an equipment;
Prevent service failures;
Allows the detection and characterization of defects;
Allows to characterize materials;
Allows making your metrological characterization by checking the dimensions.
The main techniques of Non-Destructive Testing are:
Visual Inspection
Acoustic Emission
Radiography
Penetrating Liquid
Magnetic Particles
Ultrasound
Visual Inspection
The visual/dimensional inspection test is the simplest of the non-destructive inspection methods that can be performed on a weld. In general, it can be said that it is a method to determine the acceptability of the components manufactured by machining, welding, or any other production process, which presents as a requirement a degree of quality.

For dimensioning discontinuities, it is necessary to use equipment consisting of visual aids and measuring instruments. Care should always be taken to verify the validity of the measurements of the instruments to be used.
The measuring instruments used in the visual test are: ruler, caliper, protractor or goniometer and welding gages.
Acoustic Emission
Acoustic Emission is one of the Non-Destructive Testing techniques, very useful in the detection of internal active defects in materials and equipment, detecting flaws and defects through the alteration of ultrasonic frequencies or sound waves.
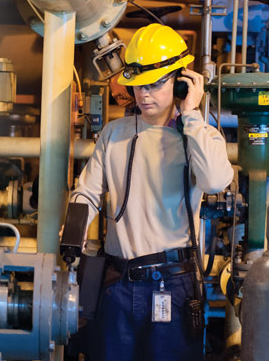
Acoustic signals, generated inside equipment in operation or when subjected to programmed loads, bring important information about the integrity of this equipment. These signs are generally associated with the presence of internal defects or with the characteristics of the operation of the equipment and its components. It is a suitable method for studying the dynamic behavior of defects present in mechanical structural components. It is a passive receptive technique for analyzing ultrasonic pulses emitted by a defect at the time of its occurrence or propagation.
Besides the application of Acoustic Emission in equipment in service, this technique is also currently used during welding manufacturing processes, where the formation of internal discontinuities and on the surface of the welds generate acoustic signals that can be registered and identified, being characterized as a non-destructive test in situ.

Radiography
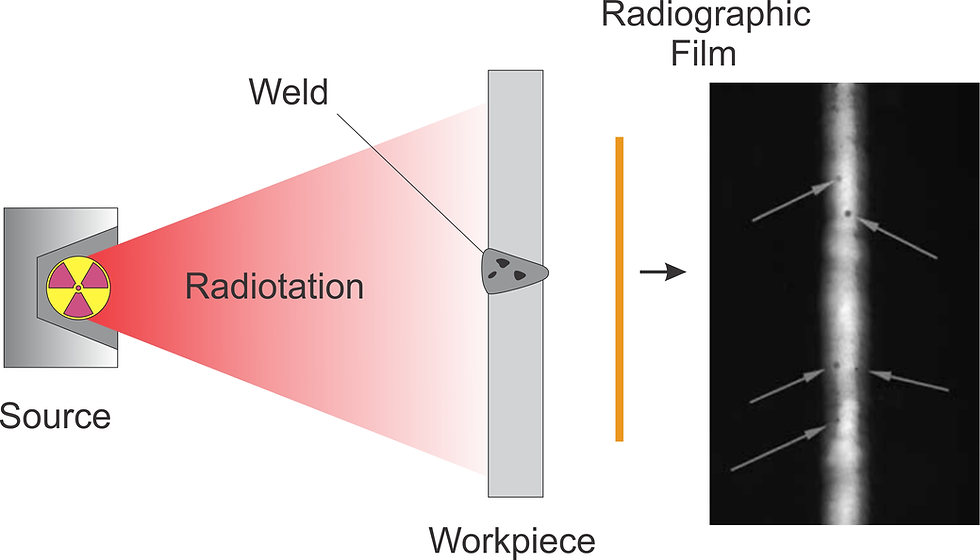
Industrial radiography is used to detect variation in a region of a given material that has a difference in thickness or density compared to a neighboring region; in other words, radiography is a method capable of detecting volumetric defects with good sensitivity. The ability of the process to detect defects with small thicknesses in planes perpendicular to the beam, such as cracking, will depend on the test technique performed. Discontinuities such as voids and inclusions that have a variable thickness in all directions are easily detected as long as they are not too small in relation to the thickness of the part.
Penetrating Liquid
The Penetrating Liquids test is considered one of the best test methods to detect surface discontinuities of non-porous materials, such as: ferrous and non-ferrous metals, aluminum, metal alloys, ceramics, glass, certain types of plastics or organo-synthetic materials. Penetrating liquids are also used to detect leaks in tubes, tanks, welds and components.


The penetrating liquid is applied with a brush, pistol, aerosol tin or even by immersing the part in the tank containing the liquid, allowing a certain time for penetration to occur. This method is based on the phenomenon of capillarity, which is the penetrating power of a liquid in extremely small areas due to its low surface tension. The penetrating power is a very important characteristic since the sensitivity of the test is extremely dependent on it.
Magnetic Particles
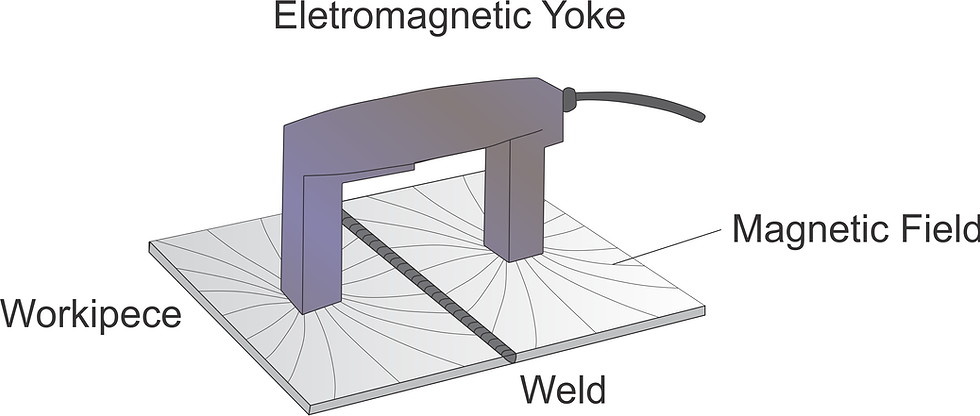
Magnetic particle testing consists of subjecting a part, or part of it, to a magnetic field. In the magnetized region of the part, the existing discontinuities, that is, the lack of continuity of the magnetic properties of the material, will cause a leakage field of the magnetic flux. The application of ferromagnetic particles causes them to agglomerate in the escape fields, since they will be attracted to them due to the appearance of magnetic poles. The agglomeration will indicate the contour of the leakage field, providing visualization of the discontinuity format and extent.

The magnetic particle test is used to locate surface and sub-surface discontinuities in ferromagnetic materials. It can be applied to both finished and semi-finished parts and during manufacturing steps.
The ideal materials for inspection by magnetic particles are ferromagnetic materials, which are materials slightly attracted to a magnet. Examples of ferromagnetic materials are iron, cobalt and almost all types of steel.
Ultrasound
The ultrasound test of materials is done with the use of mechanical or acoustic waves placed in the environment under inspection, unlike the radiographic technique that uses electromagnetic waves. It is characterized by being a non-destructive method with the objective of detecting internal discontinuities, present in the most varied types or forms of ferrous or non-ferrous materials.
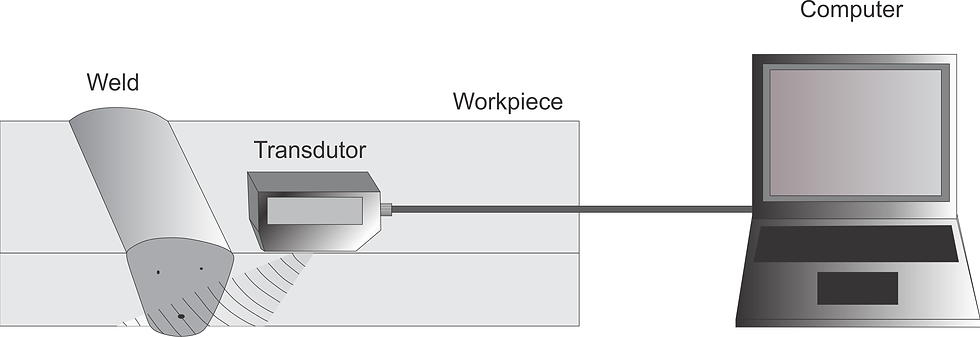
Discontinuities are characterized by the part’s own manufacturing process or by components, such as gas bubbles in castings, double lamination in laminates, microcracks in forgings, slags in welded joints and many others. Therefore, the ultrasonic examination, as well as any non-destructive examination, aims to reduce the degree of uncertainty in the use of responsible materials or parts.
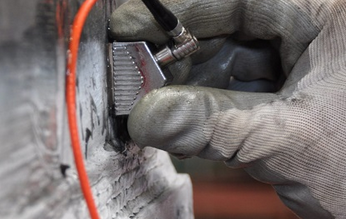
Its use can guarantee the quality of pieces of great thickness, with complex geometry of welded joints and plates. It is applied in industry, mainly in the areas of boilers and marine structures. In most cases, the tests are applied on carbon steels and to a lesser extent on stainless steels.
References: Faes K., Kwee I., Acoustic Emission Monitoring in the Field of Welding, Belgian Welding Institute.


Kommentare